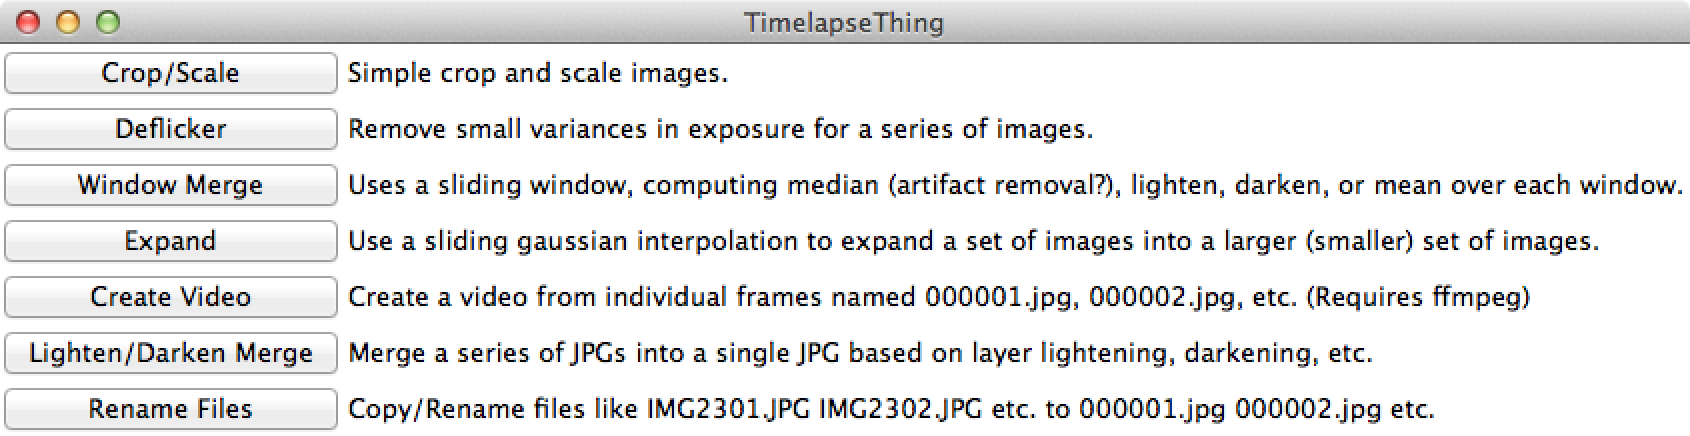
TimelapseThing is a Python script that includes a number of tools for working with timelapse image series (in JPG format). It can be used to deflicker images (if some images in the series are mildy under- or over-exposed), merge a series of JPGs into a video, batch crop and resize, expand a series into a longer series, and lighten/darken/median merge using a sliding window approach (see below) for artistic effect and artifact removal (such as someone walking across your timelapse and getting caught in a frame). The heavy lifting is done using ImageMagick’s convert tool, and ffmpeg for video creation, so these tools are required.
Preface
I’d like to preface this page by saying that there isn’t much here that is very novel; for the most part this is my own foray into creative timelapse videography, and the creative bits that I have come up with are mostly small modifications of known techniques. In particular, a1ex at magiclantern.fm deserves credit for pioneering the use of curve-fitting to exposure values over time as a method of deflickering, and Matt Molloy’s work on image stacking inspired my simple use of this technique in timelapses.
Introduction
TimelapseThing is a Python script that includes a number of tools for working with timelapse image series (in JPG format). It can be used to deflicker images (if some images in the series are mildy under- or over-exposed), merge a series of JPGs into a video, batch crop and resize, expand a series into a longer series, and lighten/darken/median merge using a sliding window approach (see below) for artistic effect and artifact removal (such as someone walking across your timelapse and getting caught in a frame).
A note on usage: I usually use Magic Lantern firmware for Canon cameras for an intervalometer; the sunset experiments below use my camera’s auto-exposure setting (aperture priority with fixed ISO, though I’m currently exploring shutter-speed priority with auto ISO and aperture which I think will be better). I also occasionally do some post-processing in Lightroom (and there are also some good tutorials and plugins available for creating timelapses from within Lightroom).
Finally, it’s a good idea to crop and resize the images to 1280x720 (for 720p) or 1920x1080 (for 1080p) first to minimize filesizes and computational time while working!
The sections below cover the various functions, starting with the coolest: deflickering and window merging.
Deflickering
The deflickering algorithm first analyzes each picture, estimating its exposure. This is done by either considering the mean exposure value of each pixel in the image, or the median. While the latter may in some situations be more robust, in my tests the choice makes very little difference, but the mean method is much faster and so this is the recommended default. Next, the algorithm adjusts the exposure of each image in an effort to produce a smooth exposure series over the timeframe. The exposures call be adjusted to match the first few frames (Flat), adjusted to match a linear fit of the original exposure series (Linear), or to match the original exposure series smoothed using a sliding window based approach (Original). Here I’d like to again acknowledge a1ex at magiclantern.fm who developed this idea using the median/Linear combination.
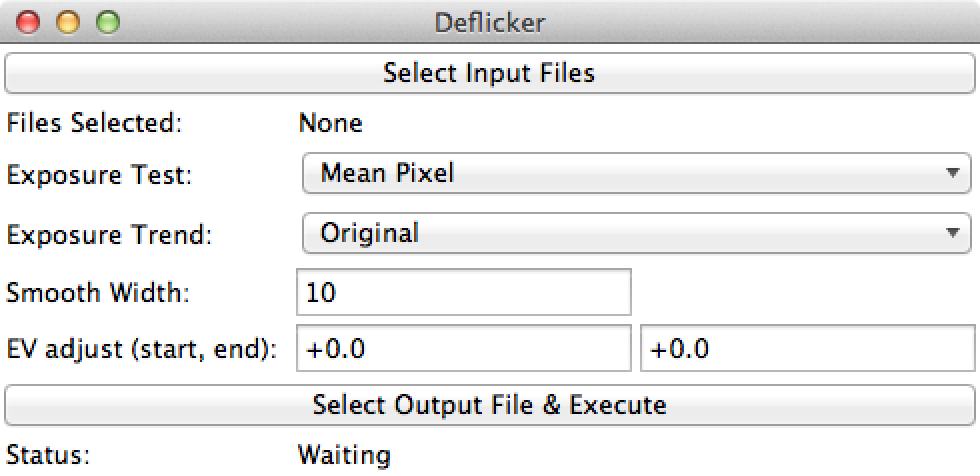
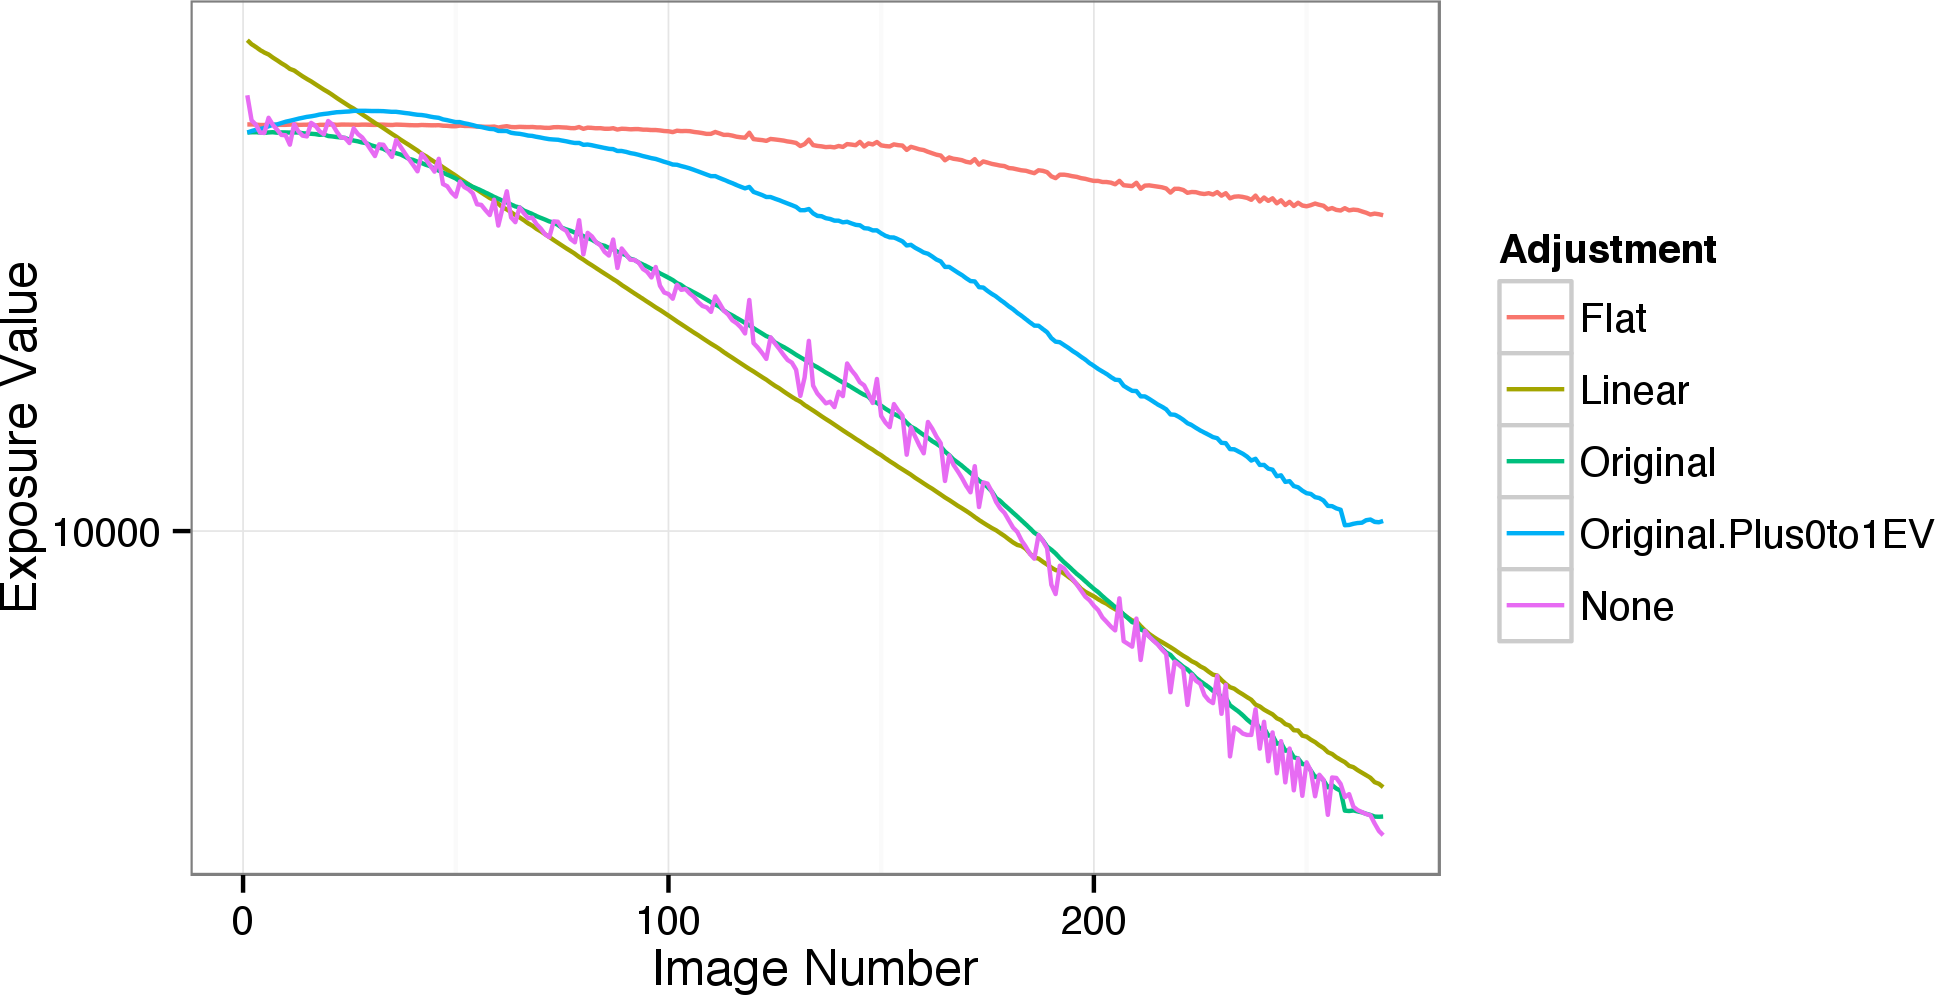
This window also allows the user to modify an exposure adjustment smoothly over time in exposure stops. For example, the Original.Plus0to1EV curve in figure 2 is the Original smoothed curve with +0EV added to the first frame through +1EV added to the last. There is also a “None” deflickering option so that this adjustment can be applied independently of deflickering.
Before and after deflickering (Original.Plus0to1EV).
One thing I’ve unfortunately noticed is that some residual flicker is very hard to get rid of. I believe this is because although I can adjust the overall exposure, exposure flicker changes not only the overall exposure of an image but also its distribution. Ideally I could redistribute the entire exposure range somehow (perhaps something like a quantile normalization method), but I haven’t figured out how to implement that yet.
Window Merging
This idea is drawn from Matt Molloy’s work on image stacking. If a timelapse looks so good when the images are stacked, why not stack subsets of the images in a sliding window and then animate the results (e.g. images 1-10 produce a frame, 2-11 produce a frame, and so on)?
As a bonus, we have the option for various kinds of stacking: we can merge images and select the mean of the pixel values, the median (very slow computationally), the lightest or the darker, for various interesting effects. The size of the window selected will also have an effect.
Lightening (left) and darkening (right) sliding-window based merging.
Notice that in the above, the darkened version removes car lights whereas the lightened version extends them. This approach can also be used for moving star trails, though here the the star trails wouldn’t ‘grow’ but would be a fixed length (determined by the window size) and move.
The median option can also be used to, in theory at least, remove single-frame artifacts such as people walking across the frame. By considering sets of windows and selecting the median pixel for each set, artifacts should be removed with minimal changes to the image. The following figure provides a crude example (where the shutter angle is too small for the timelapse) where the median pixel is selected with a small window size of 5 frames.
Removing an artifact (mid-way through left video) using a sliding-window median pattern. The stuttered motion is caused by the shutter speed being too fast relative to the frame rate.
Expansion
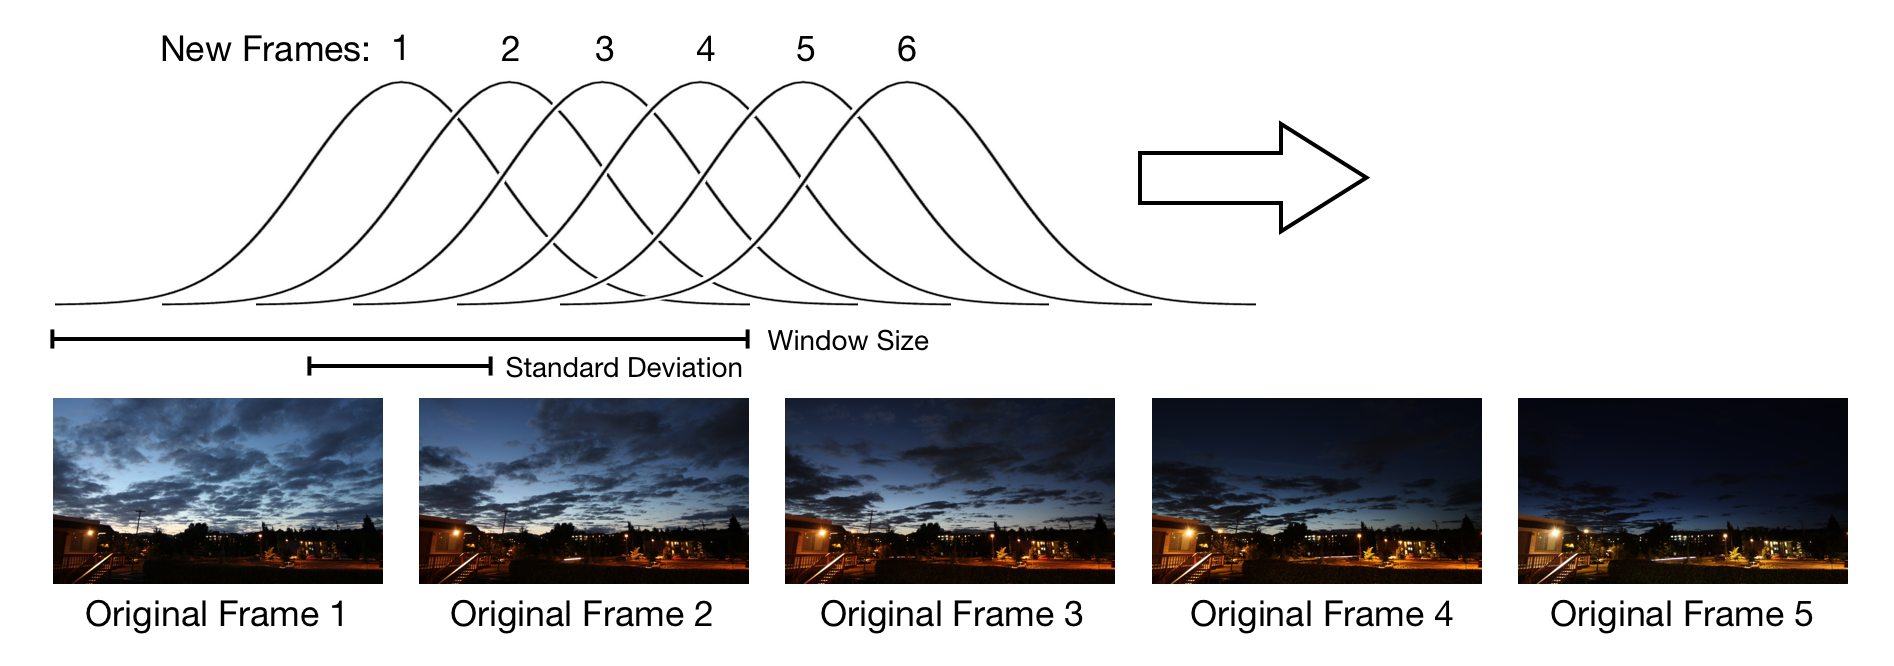
I was interested in expanding the length of my timelapses by interpolating frames (though in reality this is best done by selecting an appropriate frame rate interval and shutter speed, using neutral density filters (or more creative solutions) if necessary to allow for long exposure times). After some experimentation, I settled on interpolating images by using a sliding gaussian distribution, where we interpolate as a weighted average of frames given a standard deviation (the mean moves over the frames in steps that determine the number of new frames). To save on computation, this is only done over frames within a certain window of the mean:

To see the effect of this, compare these videos: the right video contains twice as many frames as the former, with a 1-image standard deviation interpolation. If taken to extremes, this expansion can create an interesting effect fairly reminiscent of cheap tv slow-mo shots:
Video expansion. On the left, a video shot at 60fps played back at 24fps. On the right, an expansion of 2x in length with standard deviation of 4 images.
Crop and Resize
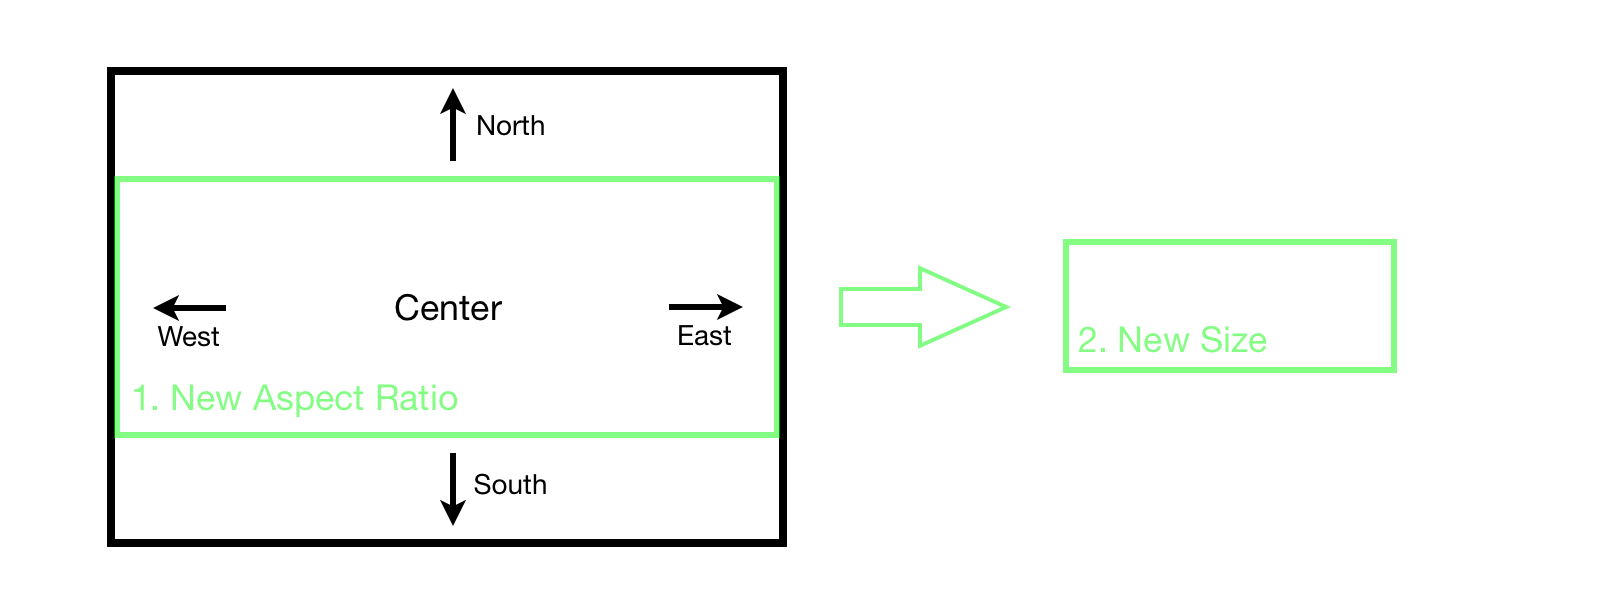
The only other feature worth discussing in detail at this time is the batch crop/resize tool. This tool allows you to select a new size for your images (say, 1280x720, for 720p) even if the new aspect ratio isn’t equal to the old aspect ratio. If the aspect ratios aren’t equal, the new aspect ratio will be calculated and the largest fitting crop with that ratio will be selected from the original frames. If the gravity option is set to “Center” it will be left alone, if set to “North” the new frame will be pushed to the top (if it isn’t already there), if “West” it will pushed to the left (if not already there), etc. After that, the selected areas are cropped and resized to produce the output.
Misc
In general, the tool will ask the user to select a series of images to operate on, and a directory for the output images to be written to. The names of written images will always be of the form 000001.jpg, 000002.jpg, and so on; if it looks like images will overwrite existing images, the user will be prompted. For usability, the default input/output directory is the most recently selected directory. When inputting a list of images, the order is usually important (for example, in window merging, they need to ordered correctly) – I believe the order used is the order they are shown by the selection window. Usually this is the correct numeric order. I may add an option to sort them internally, but this would assume a particular naming convention (such as 000001.jpg, 000002.jpg, etc.) which may change for different camera output (IMG_3134.JPG, IMG_3135.JPG, etc.).
The “Lighten/Darken Merge” button on the main interface can be used to layer merge a series of JPG images into a single composed JPGs in the style of Matt Molloy’s work on image stacking.
When creating a video, the input files must be named like 000001.jpg, 000002.jpg, etc. For this reason there is also a tool which copies a series of files and gives them names in this style.
Download
As of now Timelapsething is just a python script, so you’ll need to have Python installed: timelapsething.py. Timelapsething is provided under the 2-clause BSD license.
TimelapseThing also requires the ImageMagick suite, and ffmpeg if you want to use it for video creation (note that I’m still working on getting the settings correct for video creation, currently the command run is ffmpeg -y -r FRAMERATE -i INDIRECTORY/%06d.jpg -b:v 12000k -filter:v scale='trunc(oh*a*2)/2:HEIGHT' OUTNAME.mp4). These can be tricky to install on Mac OSX, though this link might help for ImageMagick.